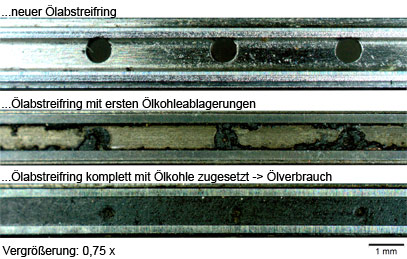
PNs sind raus. Ist natürlich viel Fachenglisch, aber durch die Zeichungen sieht man ganz gut, um was es geht!
(Vorweg: Auch verschlissene Ventilschaftdichtungen verursachen hohen Ölverbrauch - meist kann man das anhand des Verhaltens in den verschiedenen Betriebsarten erkennen, ob es eher die Abstreifringe oder die Schaftdichtungen sind)
Hier, woran man den Block erkennt:
Ich nehme nur das von Toyota empfohlene Casrol 5W30 in C3 Ausführung (übertrifft die A1 2 3 etc) seit 7 Jahren und keinerlei Probleme, kein Ölververbrauch. Ich wechsel nicht mehr.
Du brauchst 3,7l für den alten Block und 4,2 wenn Du einen neuen hast KANNST aber die 4,2l auch beim alten Block einfüllen, denn die Blöcke sind identisch, nur der Ölpeilstab.wurde auf die entsprechende erhöhte Ölmenge angepasst. Grund dafür ist die Senkung der Öltemperatur.
Übrigens:
as Motoren, die mittlerweile im Maximum hier 15 Jahre alt sind und weiss*Gott*wieviele Fahrer gehabt haben, je nach Pflege (Ölwechsel, Ölsorte, Fahrstil, Fahrgebiet) und dementsprechendem Verschleiss in dieser langen Zeit auch schonmal anfangen, etwas Öl zu nehmen, ist doch völlig nachvollziebar und auch nichts ungewöhnliches.
Welchen Block Du hast erkennst Du hier ran:
Entweder am grünen Punkt auf dem Ölpeilstab (unzuverlässig, da er auch einfach eingesetzt werden kann, wenn man beim alten Block die Ölmenge zwecks niedrigerer Öltemperatur erhöht):
oder bei einem aufbereiteten Shortblock in den letzten Jahren:
bzw. Anfangs dieser Kulanz mit neuen Blöcken ist vermutlich gar keine Seriennummer mehr vorhanden!
Paar Bilder:
Hier ein alter originaler Block. 1ZZ Kennung UND Seriennummer:
Hier ein neuer Block, ohne Seriennumern, der 2007 auf Kulanz ausgetauscht wurde:
Keine Seriennumer, wo sie original eigentlich sitzt:
Auch keine Seriennummer vorne, wie sie die letzten wieder aufbereiteten Optifit Blöcke haben:
Hier nochmal ein originaler alter Block mit Seriennummer:
Von weiter entfernt:
Hier würde die Optifit Seriennumer stehen (Wie im Schreiben genannt):
Es gab also sowohl komplett neue Blöcke, die auf Kulanz verabut wurden, als auch aufbereitete Blöcke später.
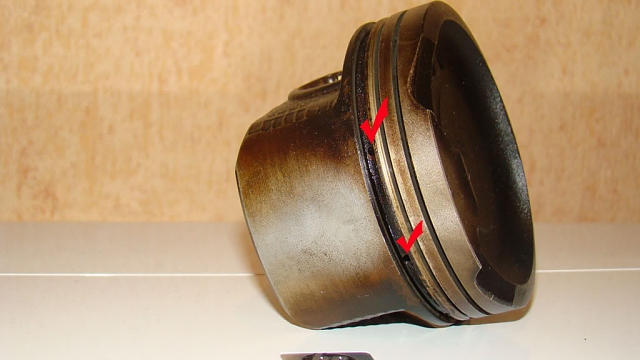
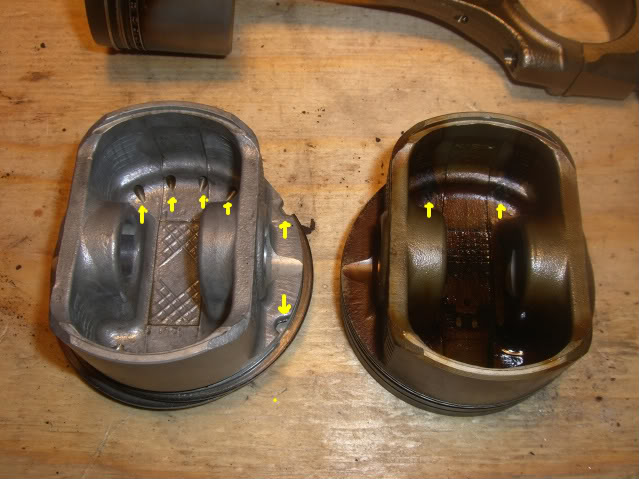
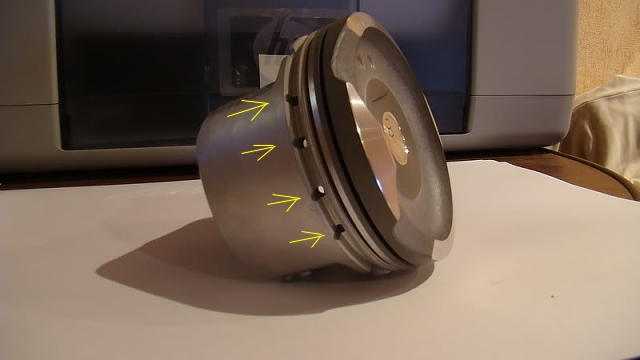
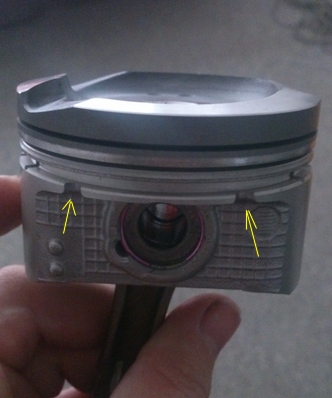
Bei ausgebauten Kolben ist es auch sofort zu erkennen:
Die alten Kolben haben nur zwei Bohrungen pro Seite:
Die neuen Kolben haben 4 Bohrungen pro Seite und noch extra eingefräste Kanten:
Auswirkungen
Meine Stellungnahme zum Thema, was man beachten muss, wenn die Kolben tauscht:
Also prinzipiell muss man einiges im Einzelfall beurteilen. DENN: Pasuchal kann man vorher nicht sagen ob ein Minimum an Teilen reicht, oder ob nicht doch mehr gemacht werden muss!
Was man vorher noch nicht absehen kann sind die folgenden Dinge:
- Zustand der Laufbuchsen
- Zustand der Kurbelwelle
Wenn die Laufbuchsen schon sehr schlecht aussehen und man so sehr honen muss, das man Übermaß benötigt, kann man auch gleich einen kompletten Block nehmen. Ähnlich verhält es sich mit der Kurbelwelle. Wenn nach herausnahme der Lagerschalen (bzw. KW Lager) zu sehen ist, das die Kurbelwelle bearbeitet werden muss bzw. man sie nicht mehr bearbeiten kann, so dass man eine neue benötigt, hätte man auch wieder gleich einen fertigen Block kaufen können!
Das sind die Unbekannten! Daher ist es immer besser, den Block erst vom Fachmann anschauen zu lassen (Vorzugsweise im ausgebauten Zustand - einige Motorenbauer können es vorher auch mit Endoskop im Laufbuchsenbereich bzw. durch entfernen der Ölwanne im Blockbereich erkennen)
Wenn ein Motorenbauer sein okay gibt, das nur die Kolben ausgetauscht werden müssen, leicht gehont werden kann und neue Lagerschalen ausreichen, kann man die Einzelteile kaufen!
Beim Kopf sollte man, wenn man bereits bei ist, die Ventilschaftdichtungen erneuern und die Ventile (mit allem was dazugehört...Ventilsitze, etc) aufarbeiten lassen. Austausch von Ventilen ist in der Regel nicht nötig. Allenfalls die Tassenstössel müssen geprüft werden, ob das Ventilspiel okay ist. Wenn nicht, werden noch 16 andere Tassenstössel benötigt!
Zu bedenken ist auch, das der Kat früher oder später das zeitliche segnen wird, da er durch das Öl beschädigt wird und das dann mit der Motorkontrollleuchte mit dem Fehler P0420 einher geht!
Meine Stellungnahme zum Thema Ölsorte wechseln:
Zum Thema Ölsorte wechseln:
Auch wenn viele meinen das wäre quatsch, was ich jetzt sage, aber ein Motor kann sich in der Tat doch vom Verschleissbild her auf eine Viskosität einlaufen.
Und nicht nur das...es kann sein das eine andere Viskosität plötzlich auch Dinge im Motor löst, was sogar zu Problemen führen kann.
Ähnlich wie Wechsel von Teilsynthetisch auf Vollsynthethisch oder Mineralöl...
Sehr gern genommenes Zitat:
Halbsynthetische Motoröle sind mitunter erforderlich
Vollsynthetische Motoröle haben zwar sehr viele Vorteile, doch können sie nicht in allen Fahrzeugen verwendet werden. Insbesondere bei etwas älteren Autos müssen häufig noch teilsynthetische Motoröle benutzt werden. Das liegt daran, dass die älteren Motoren noch etwas anders gefertigt worden sind. Die Toleranzen der einzelnen Motorkomponenten sind oftmals größer als bei neuen Motoren. Deshalb wird ein Motoröl benötigt, das eine andere molekulare Struktur aufweist. Teilsynthetische Motoröle stellen einen Kompromiss zwischen rein mineralischen Ölen und vollsynthetischen Ölen dar. Sie basieren auf Mineralöl. Den Ölen wird dann je nach Verwendungszweck ein gewisser Anteil von vollsynthetischen Ölen beigemischt. Durch die Beimischung der vollsynthetischen Öle lassen sich ebenfalls einige wichtige Eigenschaften, wie beispielsweise die Schmiereigenschaft und die Temperaturbeständigkeit, verbessern. Der Vorteil von teilsynthetischen Ölen ist, dass sie deutlich günstiger sind als vollsynthetische Motoröle.
Man glaubt kaum, was Wechsel ausmachen können!
Wie kann man einem Motor ein langes Leben bescheren
Es ist ja nun so, das mit zunehmender Laufleistung der Motor naturgemäß immer mehr verschleisst, und irgendwann natürlich der Ölverbrauch überproportional zunimmt! Wann und wieviel das sein wird hängt eben von vielen Faktoren ab. Das oft besagte Shortblock Problem bei den Pre-Facelifts mit dem massiven Ölverbrauch tritt bei etwa 80-100.000km auf. Und dann sprechen wir von deutlich über 0,5l. Das geht dann soweit, das man 1 Liter nachfüllt und er schon blau hinten rausqualmt!
Das beste, den Motor lange erhalten zu können sind:
- überdurchschnittlich häufige Ölwechsel (alle 5000km – damit sich erst gar keine Ablagerungen an den gefährdeten Stellen bilden können)
- Empfohlenes Markenöl nutzen (5W30 ist von Toyota EXPLIZIT empfohlen)
- Beim Ölwechsel den Ölfilter bereits mit Öl auffüllen, bevor man ihn reinschraubt
(denn beim starten, muss sich sonst der Ölfilter erst mit Öl voll saugen – und bis die Luft draussen ist, ist der Öldruck zu niedrig und es dauert, bis er wieder voll da ist. Mit dem auffüllen des Filters umgeht man das Problem)
- Auch mal ein bisschen Vollast auf der Autobahn fahren, um Ablagerung durch untertouriges fahren zu lösen und den Brennraum freizublasen
- Warm fahren und im Winter erst die Heizung einschalten, nachdem er einigermaßen warm ist (denn die Heizung entzieht dem mühsam warm werden Motor die ganze Wärme, sodass er länger braucht, um Betriebstemperatur zu erlangen)
- Kein untertouriges warm fahren
- Im kalten Zustand nicht zu lange im Leerlauf laufen lassen, sondern zügig losfahren (Kondenswasser schlägt sich bei wenig Last an den Brennräumen nieder und verdünnt das Öl)
- Die Ölmenge erhöhen
Mehr kann man fast nicht tun!
Meine Stellungnahme zum Thema Ölfüllmenge:
Man kann ohne bedenken die Öleinfüllmenge beim alten Block von 3,7 auf 4,2l erhöhen.
Warum?
Als damals beim Kulanzaustausch noch neue Blöcke mit den neuen überarbeiteten Kolben verbaut wurden, wurde auch die Öleinfüllmenge um 0,5l auf 4,2l erhöht. Grund ist die Senkung der Öltemperatur! Die Blöcke haben das selbe Fassungsvermögen, da sie gleich sind! Daher wurde dann auch der neue Stab mit besagtem blauen/grünen Punkt verbaut, der um 0,5l versetzte Pins besitzt!
Eine zu hohe Öltemperatur in Verbindung mit den problematischen Kolben (Die Thematik hänge ich nochmal in einer PDF gleich an) führte mit zu dem bekannten Problem des Ölverbrauchs. Daher kann man dem zumindest dahingehend schonmal etwas vorbeugen. Aber trotzdem bleibem bei den alten Blöcken mit den alten Kolben eben noch die anderen Probleme, die zu dem massiven Ölverbrauch führten.
Ich sage bewusst "massiv", denn das Motoren die mittlerweile im Maximum hier 16 Jahre alt sind und bei einigen weiss Gott wieviele Fahrer gehabt haben, je nach Pflege (Ölwechsel, Ölsorte, Fahrstil, Fahrgebiet) und dementsprechendem Verschleiss in dieser langen Zeit auch schonmal anfangen, etwas Öl zu nehmen, ist doch völlig nachvollziebar und auch nichts ungewöhnliches. Es macht auch einen Unterschied, ob es Langstreckenautos sind, die oft und lange unter Volllast auf der Autobahn bei hohen Drehzahlen, entsprechenden Brennraumdruck, hohem Öldruck und hoher Öltemperatur gefahren wurden. Diese Autos nehmen generell mal etwas Öl!
Andere Hersteller schreiben im Vorfeld schon in ihre Betrebiebsanleitungen, das ein Ölverbrauch von bis zu 1L auf 1000km normal ist, um sich etwas aus der Affäre zu ziehen. Auch Toyota. Aber Toyota sagte trotzdem, das das eben nicht normal ist, sondern gab zu, das es ein Problem mit dem Motor gab!
Das beste, was Du momentan Deinem Motor antun kannst ist einfach die Intervalle zu verkürzen. Ich z.B. mache alle 5000km einen Ölwechsel und fülle den Filter vor dem Einbau auf, damit der Öldruck gleich wieder anliegt!
Wer Bock hat kann sich auch das hier anschauen

Objective: FIX OIL CONSUMPTION PROBLEM
COMPLETED: '98 Prizm, '99 Prizm, '00 Prizm, '01 Corolla (Alec1), '01 Celica GT (01 Celica Gt), '00 Celica GT-S 2ZZ-GE (01 Celica Gt), '01 Saturn SL2, '00 Corolla (mattqb17).
Coming soon???: 2000 Prizm & 2001 Prizm
YOUTUBE VIDEO based on this write up, done by "Phoenix and Dad"
Reasons not to wait:
1: This is a 1 time fix. Once fixed (per this writeup) the problem will not come back.
2: Oil is not cheap.
3: If you run it low on oil you risk ruining the engine.
4: If you let it go long enough you WILL:
a. Burn an exhaust valve (due to carbon build up)
b: Ruin the catalitic converter (due to carbon build up)
c: Ruin 1 or both O2 sensors (due to carbon build up)
These things (a, b & c) will start happening at the qt. every 100-150 miles consumption rate when you keep driving it for 16,000 miles if you get what i'm saying.
Part 1: Parts & special tools needed.
You will need a good clean work place and you should allow yourself plenty of time.
Take your time and do it right once. It's much faster that way. I highly recommend the exact parts listed below.
Parts:
Piston ring set: DNJ Engine Components #PR946 $40.79
Head Gasket Set: Fel-Pro #HS26158PT $103.89 for '98 & '99 OR #HS26158PT1 for '00+
Head Bolt Set: Fel-Pro #ES710661 $55.79 (head bolts are “torque to yield” and must be replaced)
Above parts purchased from Rockauto.com for $207.78 shipped (with 5% discount code)
If there is any chance the engine was run low on oil then I would recomend ordering new bearings just in case.
Bearing set: DNJ (standard size) #RB946 $24.79 (rockauto.com)
Tube of high temp RTV $5~
5qt
conventional 5w30 oil & filter $18~
Coolant $12~
Several (4 or 5) cans of brake parts cleaner $2.50 each
A roll of “shop towels” $3
Tools:
#1 Cylinder hone. I can’t remember when or where I got this one. It was a cheap one.
#2 Gearwrench ratcheting external torx wrench (E6 & E8), this it technically not the right size but they don't make one like this that is the right size and you are just removing a stud so it is not an issue. You can do it without this but it’s easier with.
http://www.amazon.com/Gear-Wrench-9220-Torx-Ratcheting/dp/B000HBC79E
#3 E5 ¼ drive socket, you can do it without this but it’s easier with.
http://www.amazon.com/Lisle-Tools-Creepers-26770-Socket/dp/B0002JMJD0
#4 Craftsman 3/8 drive torque wrench (25-250inlb.)
#5 Craftsman 1/2 drive torque wrench (20-150ftlb.)
#6 OTC 4572 valve spring compressor:
http://www.amazon.com/OTC-4572-Large-Spring-Compressor/dp/B000F5ECUY
#7 Small piece of 3” PVC pipe cut down one side
#8 Gotta have tunes.
#9 (not pictures)
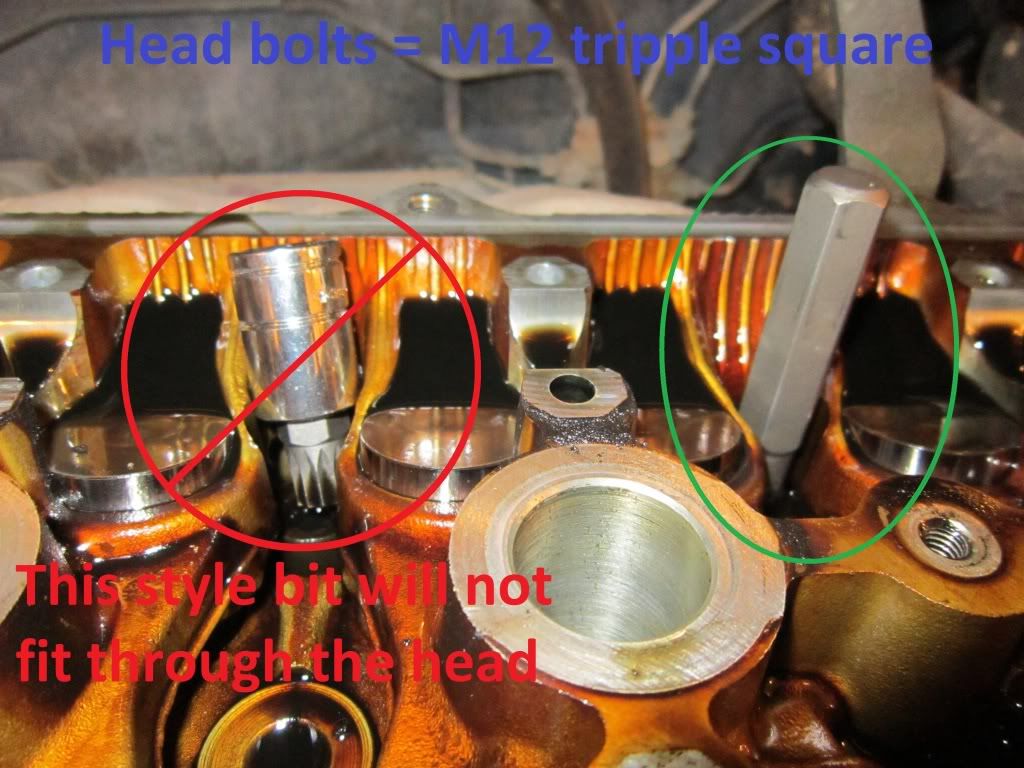
10MM bi-hexagon bit. I have used an M12 triple square bit and not had an issue, you could also probably get away with a 10MM hex bit, only the 10MM bi-hex is the correct one though. A standard (short) length bit will not work for this (see pics below), it must be several inches long to reach through the head and get to the bolt. (link and info thanks to
bustedstuff104)
#10 (not pictured) feeler gauge.
#11 A decent selection of standard tools will be needed which I have not individually listed.
#12 A service manual. Factory, Haynes or Chilton.
Part 2: Removing the head.
I won’t be covering every single step. I’m going to try and highlight some of the key things that are maybe less obvious. I’m trying to avoid writing a book.
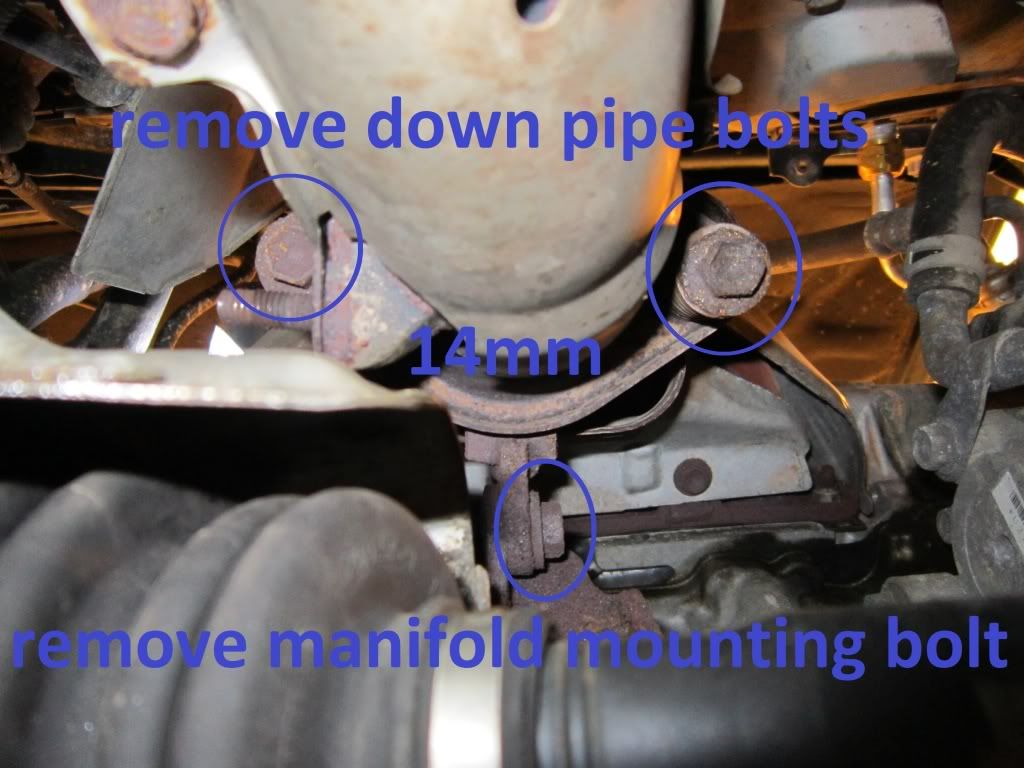
1: From above, remove the upstream O2 sensor from the exhaust (skip this step on Celicas). It does not need to be unplugged. This is removed to gain access to the exhaust manifold bolt. From below the car, remove exhaust manifold bolts (2) and mounting bolt (1) between engine and manifold. I usually get this bolt with a 24" extension and a swivel socket from the passanger side wheel well. You are done under the car for the rest of part 2.
2: Disconnect and pull the cruise control and plug wires over the driver side of engine bay. Disconnect the PCV valve and breather tube from the valve cover.
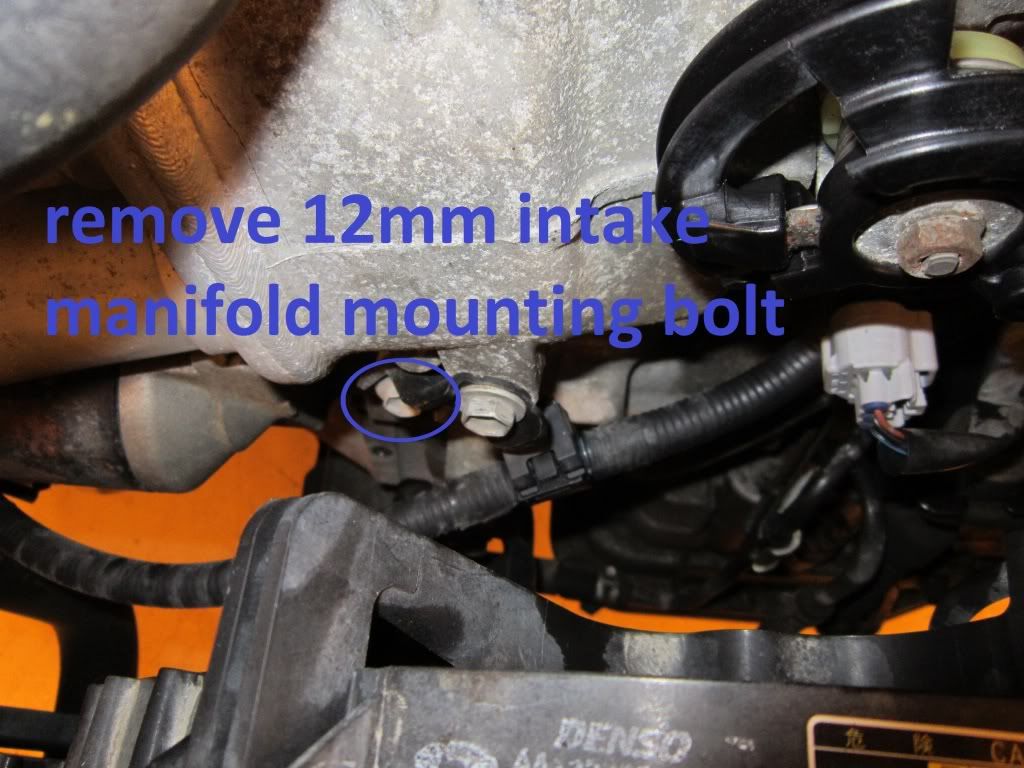
3: Remove the valve cover. Unbolt the fuel rail and intake manifold from the head, and the one additional bolt show in pic below. Swing fuel rail over to the driver side of engine bay. Intake can be pulled out enough to be removed from the studs.
4: Remove the cam sprockets (14mm). If it's a VVT engine just remove the exhaust cam srocket. There is no need to worry about timing or cam & engine position at this point. Have a clean open space to lay everything out on EXACTLY as it can off the engine. It is important to put each piece in the exact same location it came from.
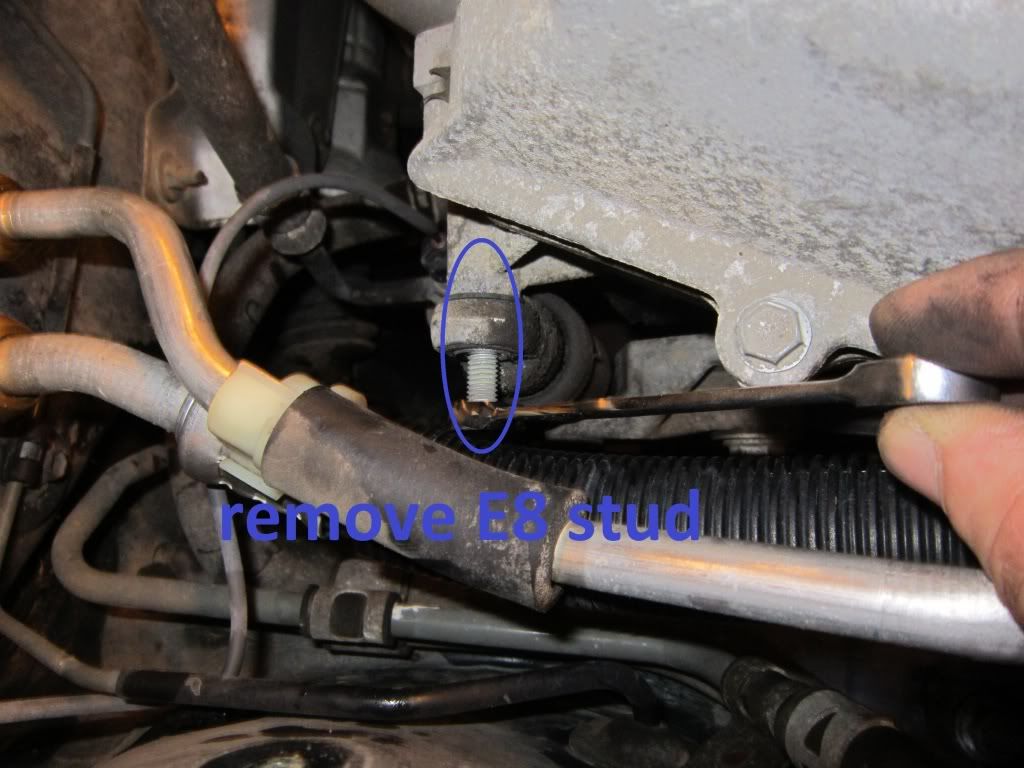
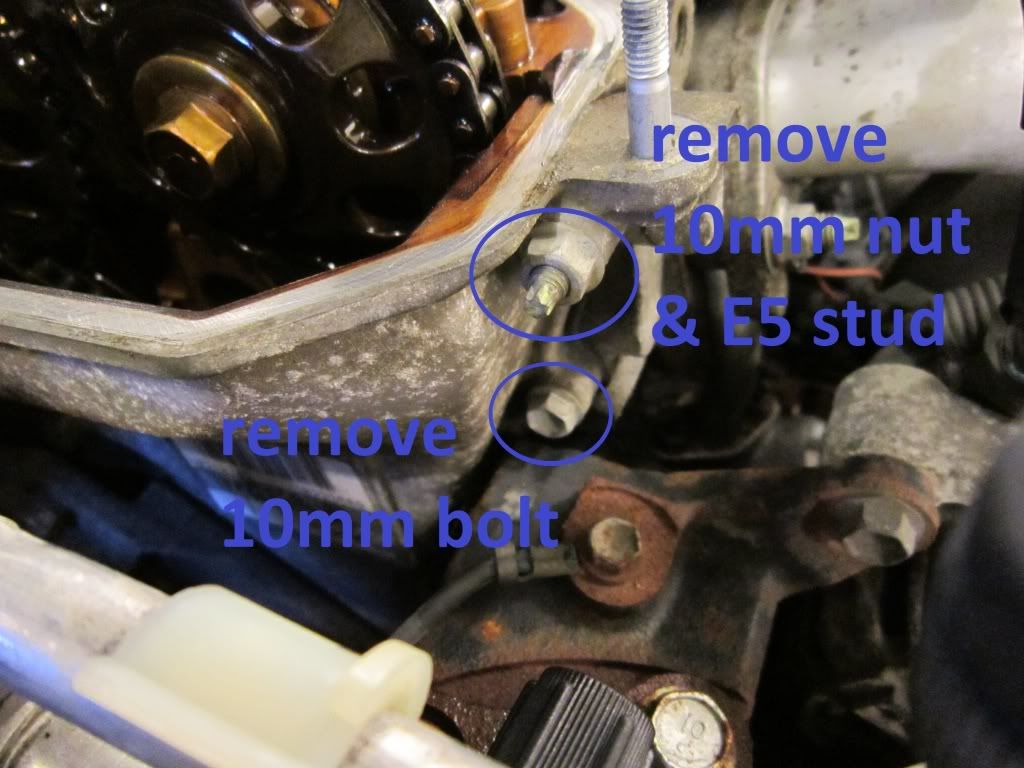
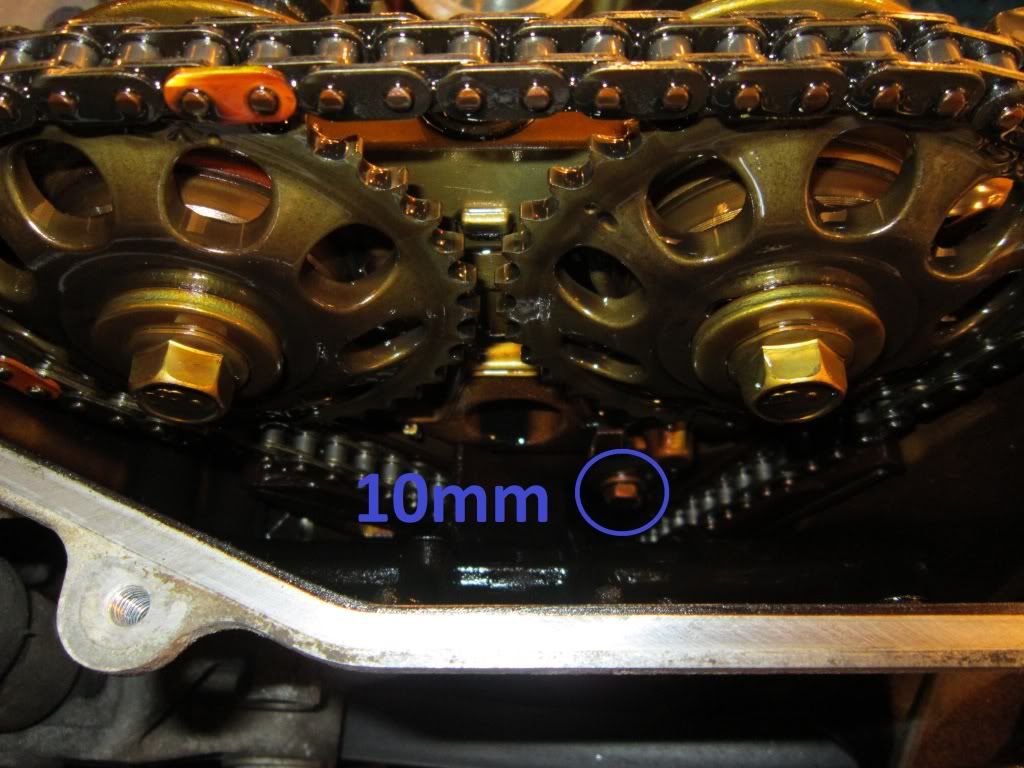
5: Remove timing cover bolts and studs. There are 2 studs pictured below. I think the left stud (on the belt tensioner) is actually E7 but I didn't have E7 and E8 worked just fine. The stud towards the front of the car is E5. There are 4 more 10mm bolts 3 on the outside and one on the inside.
I can’t lie, I had lots of help
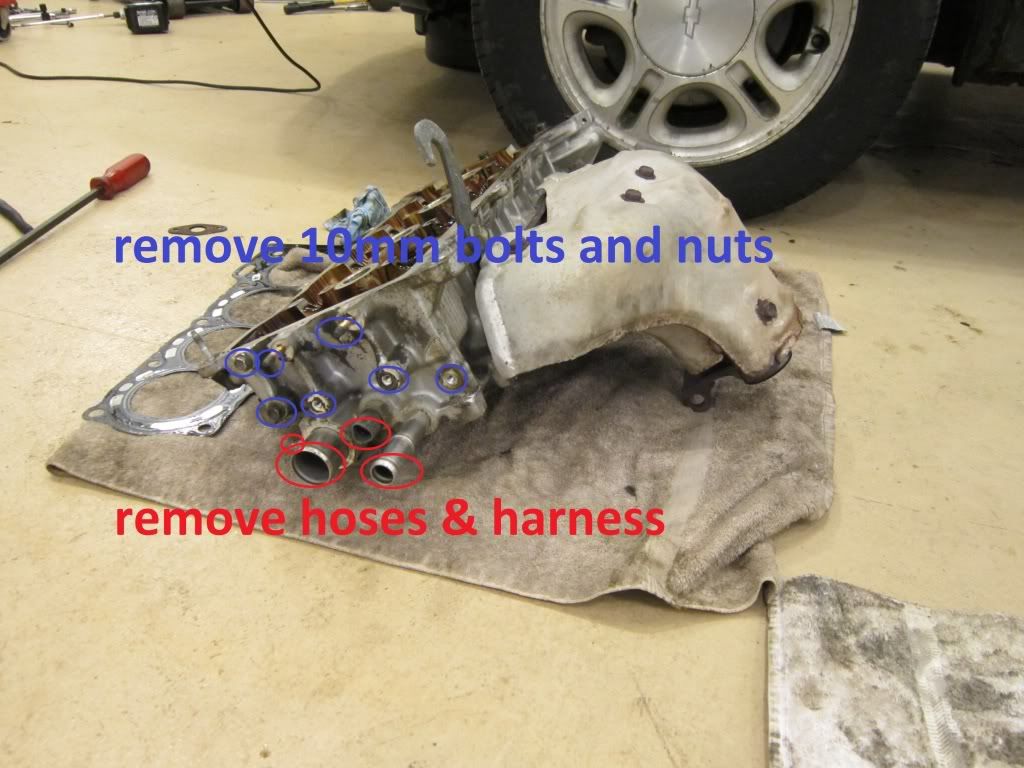
6: Remove everything from rear (driver side) of the head. Here is a good after the fact pic:
7: Pull the cams (10mm & 12mm). Again, set them out exactly as they were placed on the head. They are marked but it’s very simple to just lay them all out in order.
8: Remove head bolts (M12 triple square). Do not use an impact to removed any bolt that is bolted in to aluminum.
9: Pull head and exhaust manifold!
Part 3: Removing pistons, honing re-ringing and reinstalling pistons.
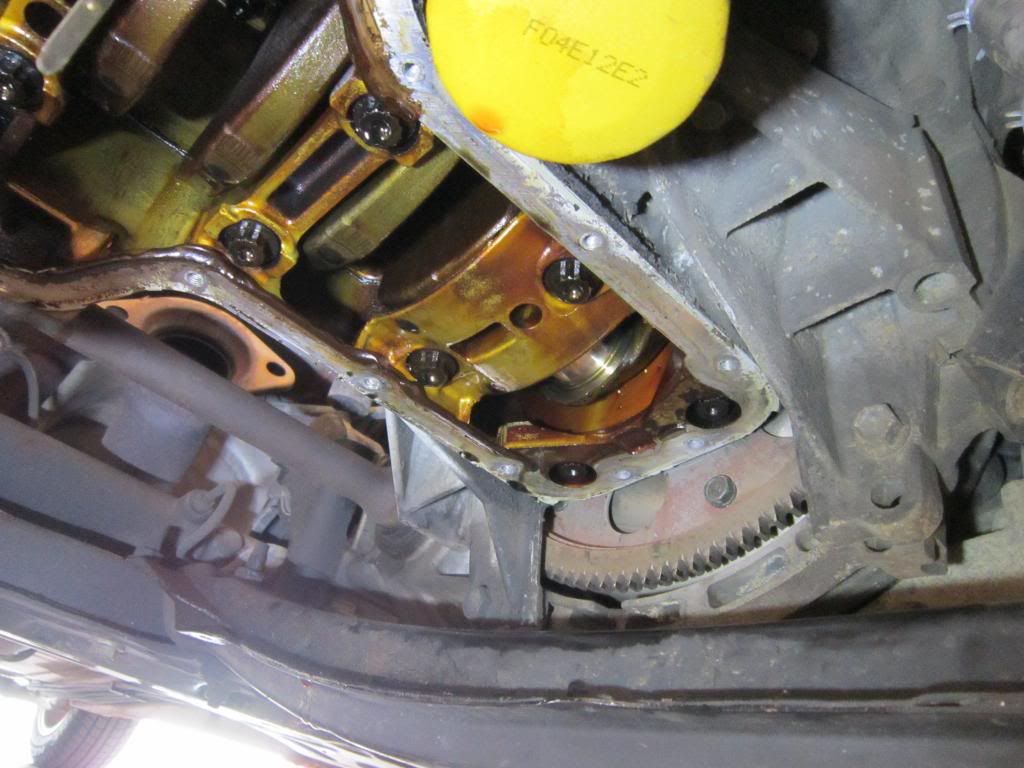
1: Remove the oil pan. I have yet to remove the brace that runs under the pan for this. It would make it easier but it looks like a pain to take out.
The pan is sealed on with RTV. There is a nice spot to pry against towards the back of the engine by the flex plate. And you will need to pry!
Here is a Celica shot. There is a little more room between the K member and engine in the Celica:
2: At this point you will need to rotate the engine in to position. It can either be with pistons 1 and 4 all the way down or with 2 and 3 all the way down.
You will need to lift the timing chain up until it’s tight so that it doesn’t bind as you rotate the engine. With the head off there should be almost no resistance to turning the engine over. If there is, don't force it, double check the timing chain.
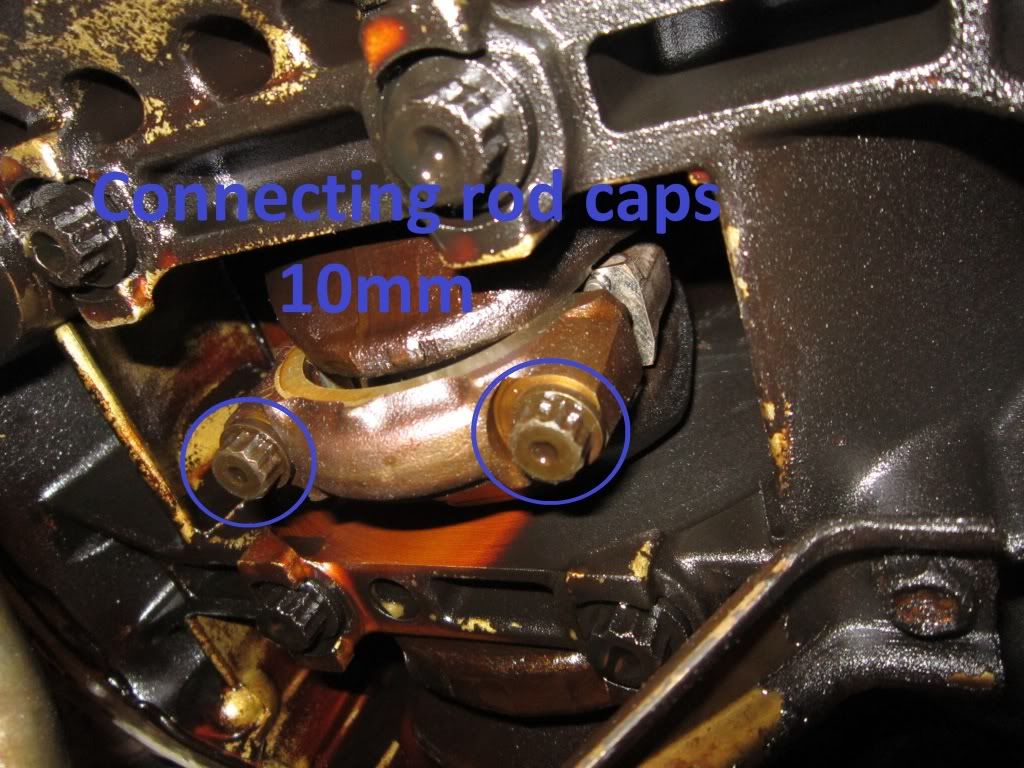
3: Remove connecting rod caps (12pt 10mm).
I only remove 1 piston at a time so that nothing gets mixed up. Pull cap, then using a ¼ drive socket extension inserted in to one of the bolt holes, push rod and piston straight up and out of cylinder. Be careful! You don't want to damage the crank / rod bearing surfaces or the cylinder walls. The ¼ drive socket extension really does work very well.
Here is what a well cared for Toyota rod bearing looks like @ 265K miles. No reason the check for tolerance on these:
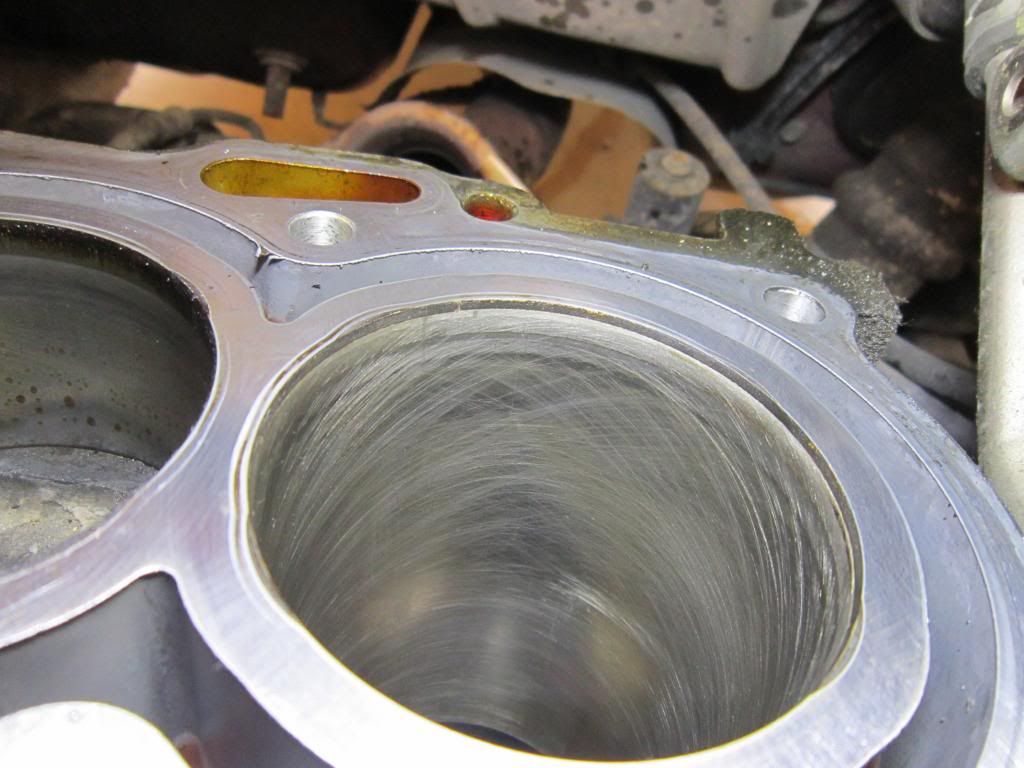
Here is what the cylinder looks like. You can still see the cross hatches:
4: Hone the cylinder. You will want to put a rag in the bottom to catch ANYTHING that may fall down on to the crank bearing surface. Generously spray some WD-40 in the cylinder and on the hone. Push and pull the hone up and down as you go to achieve nice cross hatches. Remember: this is to de-glaze the cylinder wall, not bore it out. 20 seconds or so per cylinder should be enough. The honing is necessary for the new rings to seat properly.
What it should look like:
5: Piston update, cleanup and re-ring. After removing the rings here is what you will find. The oil drain holes are all completely clogged. The is not as bad as my other Prizm because the rings themselves are not completely seized in the groves. In this case I was burning about a qt. every 400-600 miles. My other Prizm, qt. every 100 miles.
I drilled clean the 4 original holes and added 2 more on each piston. I don’t know exactly what the drill bit size was. It was just the biggest one I had around that was smaller than the oil ring grove. It was slightly larger than factory.
Take one of the original compression rings and cut it in half. Use it to scrap clean all the ring groves on the piston.
I used an angle die grinder with a very nonaggressive stripping disc to clean off the piston surface. Then CLEAN, CLEAN, CLEAN everything!!! Compressed air and brake parts cleaner are your best friends! You do not want any metal shavings from the drilling going back in to the engine!
Install new rings. The new rings come in marked bags. Do not remove them from the bags until you are installing them on the piston. If there is writing/markings on the rings install them with the writing facing the top of the piston, more on this can be seen on page 21 of this writeup, thanks
doctorbee!). #1 compression ring goes on the top grove, then #2 compression, then #3 oil ring assemblies. Rotate the rings so that the gaps alternate and so that the gaps are located on the wrist pin sides of the pistons.
6: Wipe clean the cylinder walls, oil the rings and piston assembly generously and reinstall the piston using the PVC pipe as a ring compressor. Use the bottom of a hammer handle to LIGHTLY tap the piston in to place. If it is not going verify the rings are compressed all the way.
CAREFULLY push piston all the way down while aligning connecting rod with crankshaft. *You don't want to damage the crank / rod bearing surfaces or the cylinder walls*. You may need the help of a friend since you can’t really be above and below the engine at the same time. I have had a pretty easy time rotating the crank to the perfect position that the rods naturally will go down to. Oil and reinstall rod caps. Torque bolts to 15ftlb (180inlb on my wrench), then turn an additional 90*.
Repeat step 2-5 for all pistons and cylinders. The #4 cylinder is a pain with the brace running under the engine.
7: Clean oil pan. Mine was pretty good but this is the time to clean out any sludge in the bottom of the pan. I used brake parts cleaner and rags. Scrap off gasket RTV from both the pan and the engine block, wipe clean with rag and brake parts cleaner. Apply bead of RTV to oil pan and reinstall pan.
MORE TO COME..........
Part 4: Head disassembly, cleanup and valve seal replacement.
1: Remove the exhaust manifold from the head. I like to clean a nice space off the workbench to do the rest of the head work.
2: Using a magnet, remove the bucket style lifters from each valve and place them in order on the workbench. You can see how I have everything in order that has been removed.
3: Using the valve spring compressor, compress each valve and remove the valve keepers with a magnet and a screwdriver. The rotor is just a counter weight.
4: Remove all the valve seals. I mostly used a needle nose pliers but a flathead screwdriver can be used on some of them. They can be a pain. Be very careful not do damage the inside of the valve guide while you are doing this.
Here is the disassembled head. Clean up the head as much as needed.
5: Install new valve seals. I used a 10mm nut driver and a rubber mallet to install them.
6: I used a bench grinder with a wire brush to clean all the carbon buildup off the valves. Some of the buildup really didn’t want to come off but in the end everything cleaned up nice.
7: I dip the valve tip in oil before installing them back in to the head. Install springs retainer and keepers. It will likely take lots of patients to get the keepers back in. After installing them I use a small brass pipe and a rubber mallet to tap on the top of the valve to make sure everything seated correctly.
8: Install lifters using lots of oil. If you look under them you will see there is a number engraved. That is important if any of the valves are out of “adjustment”. More on that later.
9: Check valve clearance: Install the cams. Torque #1 journal to 17ftlb., torque all others to 120inlb. You can rotate the cams as needed with a cresent wrench on the center of the cam. With the cam lobs up, use a feeler gauge to check for 0.006-0.010in on the intake valves & 0.010-0.014in on the exhaust valves. If everything is in spec remove the cams.
It may seem redundant to install the cams just to check for clearance at this point but it is by far the easiest point to check and adjust if needed. The clearance wears tighter as time goes one so if anything I like to see tolerance on the high end.
Cleaned and fully assembled head:
Part 5: Installing the head & cams, timing
1: Torque to yield head bolts, gasket surface prep: TTY bolts are designed to stretch and are a one time use bolt. Let’s face it, back in the 80’s and 90’s head gaskets were a pretty normal thing to go out. That’s not the case anymore. They seem to have this stuff figured out pretty good so I’m not messing around with it. I’ve heard that you should not even use an abrasive disc on the head gasket surfaces so I don’t. I hit them up with some brake parts cleaner and that’s about it. And I always replace the bolts because that’s what’s called for!
Set the head gasket in place & put a bead of RTV on the timing cover & ***LEAVE THE TIMING CHAIN TENSIONER INSTALLED***. It will help keep one of the chain guide out of the way of the head. RTV exhaust doughnut on to exhaust manifold (just enough to hold it in place).
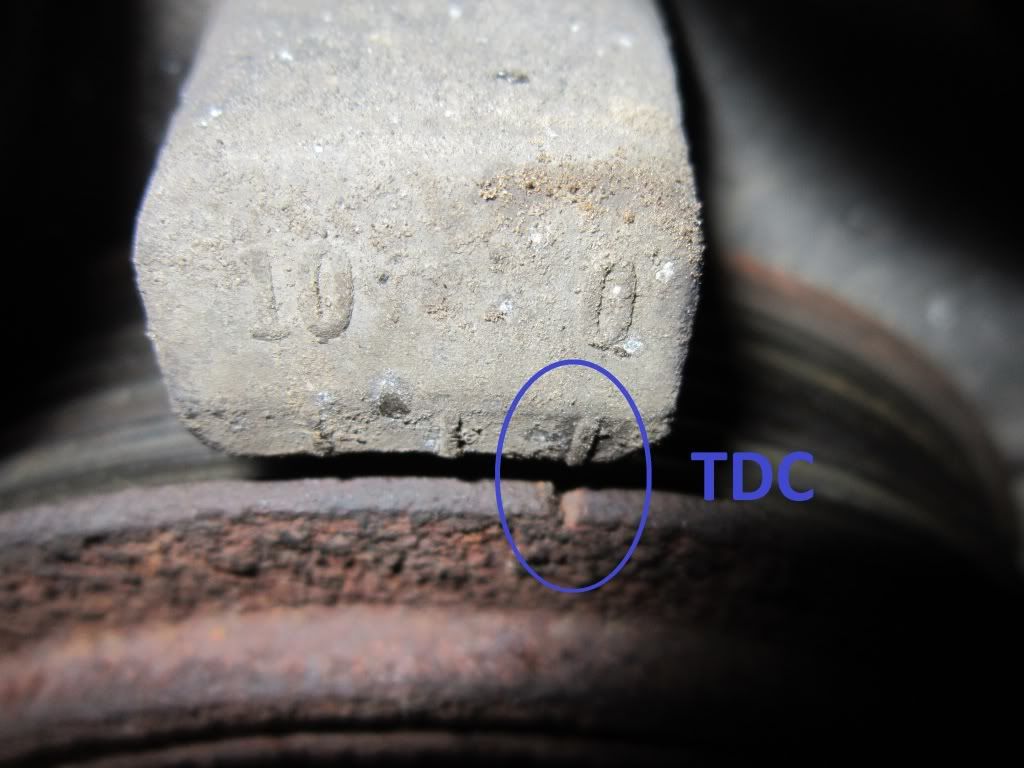
2: Turn engine to TDC. Here it a pic of the harmonic balancer and the timing mark:
3: Install the head. Take your time, make sure everything is lining up right and don’t force anything. Double check the timing chain guide ( on the firewall side of the engine). Make sure you can move it. If needed remove the tensioner so you can get it to seat right. You will need Follow a manual for torque specs and tightening sequence of head bolts. Install timing cover bolts and studs. It’s a pain getting the bolt back in on the inside. I used a screwdriver to put some tension on it and a ratcheting box wrench to tighten it. I don’t know if any other tool could get in there to tighten it.
4: Install the cams in the position shown in the pic below (this is extremely important). Torque #1 journal to 17ftlb., torque all others to 120inlb.
5: Remove the timing chain tensioner. This is where things get a little tricky. You have to align the timing chain on the cam sprockets, then install the cam sprockets.
You will need to install the chain on the intake cam sprocket so that when installed on the cam
a. The timing mark still on 0*
b. All the tension is taken out of the chain between the intake cam and the crankshaft
c. The cam is in the exact position shown below (clocked just to the right of “12 0’clock): Note: the mark on the sprocket will be in the center of a link just as show. You will need to rotate the cam slightly during this process to get everything lined up just right.
Install the chain on the exhaust cam sprocket, then install the sprocket on the cam by rotating the cam as needed. Look at the picture and count the number of links between the 2 marks. When correct the intake cam is clocked slightly right and the exhaust cam is clocked slightly left from 12 o’clock when the crank timing mark is still right at 0*
6: Install the timing chain tensioner. Compress the tensioner, and lock it in place:
Install it back in the timing cover. From inside the timing cover, press back on the tensioner with the chain guide to release it. Put a wrench on the exhaust cam and turn it counter clock wise to verify all the chain tension has been taken out. There will be a little bit of play but not much.
7: Inspect the timing marks. Verify they still all line up. If they do rotate the engine a couple rotation with a wrench on the cam (do this without spark plugs installed). Everything should rotate pretty easy. If you got it timed right at some point you should see this (the white links on the chain are lined up with the timing marks on the sprockets):
Part 6: Almost done!
1: Change oil filter and pour 4.5qts fresh conventional oil all over cam and timing chain.
Install: Valve cover, spark plugs, intake manifold, injectors and fuel rail assembly, coolant hoses, coil packs and plug wires, accessory belt, exhaust system, O2 sensor, cruise control.
2: Double check everything!
3: Top off coolant, check oil level
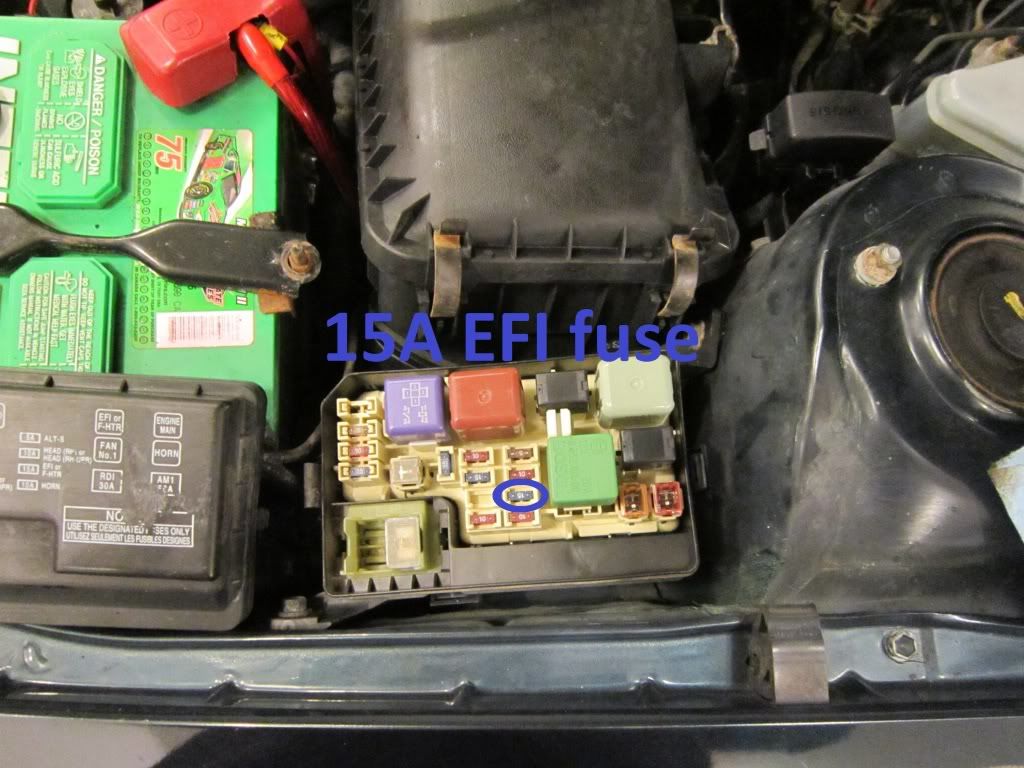
4: Prime the oiling system: Remove EFI fuse from the under hood fuse box. Turn the ignition key to the start position and turn over the engine for 20-30 seconds.
5: Put the fuse back and start this thing up! If you oiled everything like you were supposed to it will smoke pretty good for a few minutes. Check coolant and oil level again.
6: Break in: Check coolant and oil level again, then drive it like you stole it!
Drive it at varying engine speeds and throttle positions as much as possible to help seat the new rings. WOT is the best thing for the new rings to seat. Some people say baby the crap out of it durring break it. I don't agree but I thought I'd mention that so that you can do your own research and decide what method you prefer.
After 500 miles change the oil and filter again with conventional oil. I usually go another 2,000 miles and then do another change and change to synthetic at this point. Don’t forget to check coolant and oil level some more.

Oder wer des russischen mächtig ist:
http://www.toyota-club.net/files/faq/04-01-10_rem_1zzfe.htm


